Wednesday, January 30, 2013

Whitewashing a Crate Table & Tool Carrier


Isn't this the cutest little table? It didn't start out that way. . . .

Ugly, huh?
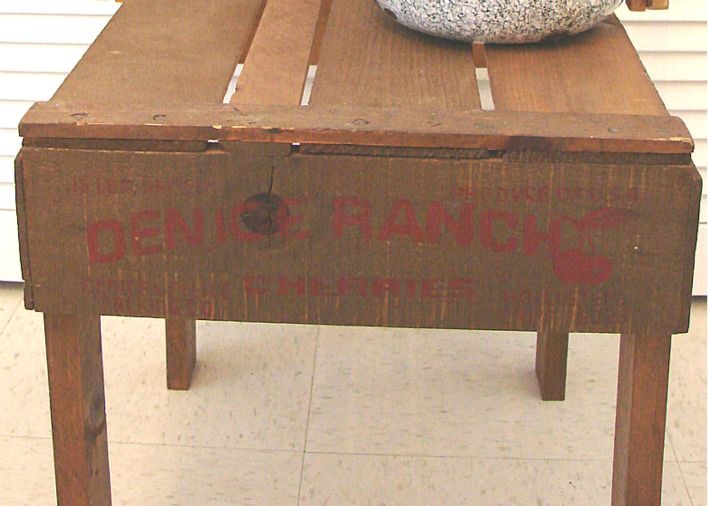
I've built many tables over the years out of fruit crates--very simple--just add legs. . . . Several months ago, I asked John to make one for me as a prop for photographs. . . .He decided on his own to stain it. . . .You can see the result. . . .
Not exactly the look I wanted.

I decided to give it a whitewash--even though the printing on the ends was lost. . . .


It was worth it to get rid of that ugly stain. . . .

If you missed my fast and easy whitewash technique, check it out HERE.


Bless his heart--John was feeling a little bad that I had to whitewash over the printing--so he went to his stash of vintage labels and came out with several for me to choose from for the end pieces. . . . I chose the corn. . . . It has lots of white, with some  color. . . . It also fit the best. . . .Simply decoupaged it on. . . .


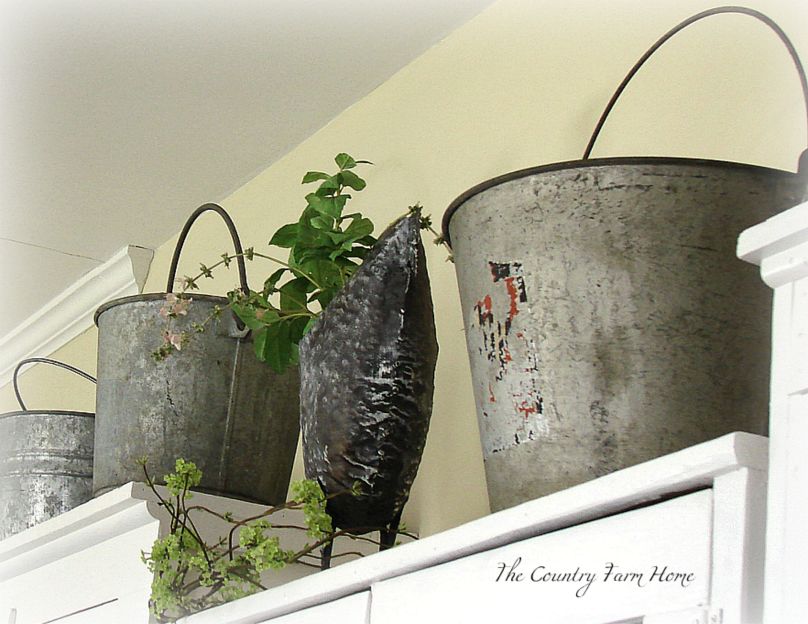
I had one other piece to whitewash--the vintage tool carrier I used at Christmas. . . .


It's the one on top of this "to paint" pile. . . .
 
 
John wanted me to use another of his labels on the tool carrier,
 but I like it with the whitewash alone. . . .It's Plain & Simple. . . .
 
 
Piece by piece I'm dwindling down the pile of furniture to paint. . . .will have more pieces to share with you along the way. . . .I have to admit, I was surprised how cute the little crate table turned out . . . .Guess it's a good example of an old saying around here--I made a "silk purse out of a sow's ear". . . .never giving up on a mistake.
 
 
On a different note, my computer "broke" Monday--with documents, information, bath photos, blogging photos, etc. on it. And, all the good posts I had planned are in limbo somewhere. . . .I feel LOST!. . . .I'm borrowing John's new one (a Christmas gift) when he isn't using it. . . .But, my time is limited. . . .Hopefully, I'll have my own computer back next week and will be answering all your emails and comments and visiting your blogs. . . .Keep you fingers crossed for me! I miss ya'll!
 
. . .from my farmhouse to yours. . .


Tuesday, January 29, 2013

Rag Rug Weaving Tutorial and Tips


Hi, Everyone! I'm back again with the two recently finished Rag Rugs. . . This time, I have a tutorial on turning at the end of a row and a few other  tips I picked up along the way. . . .
So, this is mostly a post for Rag Ruggers and Rag Rugging Wanna-Bees. . . .or for those with a curiosity about this fun Folk Art.

Without any further chattering, I'll start sharing! Click on any of the photos for a larger view.

A Short Tutorial on Turning at the End of the Row:
Turning around and starting back at the end
of the row can be confusing.
Believe me, I know. . . .I still have to "think" to get the steps right. . . .


Here we are, at the end of the row--
the last two warps remain--weaving to the right.
Remember to treat the last warp and the metal rod as one. . . .
 
Left strip over right, under last warp and rod. . . . 

 
Hold that strip out straight so you don't get confused. . . .


With the strip held straight, take the now left strip over,
around and back through--
 between the rod strip and the second warp. . . .
Pull tight. . . .
 
  
Now, you're ready to weave back toward the left--
right strip (the one sticking out to the side) over left. . . .
under and up between the second and third warp strip. . . .
continue to the end.
When you reach the left rod, use the same technique--
but, of course this time it's right over left until you get turned around.
 
 
Handy Tip on making the last two rows simpler to weave

 
The last two rows are always hard to weave for me. In the past, I used a crochet hook to pull the strips through. One day, I was struggling with the hook, the strip kept coming off, and out of frustration, I took a large bobby pin out of my hair and used it like a giant needle. . . .


It worked!
I now use a large bobby pin on the end of each strip--
much, much faster.

 
A Tip on finishing the back.

 
I've found that I don't like knotting the strips in back when finishing off the rug. Especially with denim, I end up with a big bump. Recently, I've finished by weaving the ends through a couple of back loops.  If I think they might work themselves out,  I tack them with a needle and thread. Then I can cut the ends off and not worry about the tails coming loose.


 The Fringe Option

 
To add fringe to your rugs. . .
Once you remove the rug from it's loom, the warp loops
 on the ends are fairly well exposed.
 Sometimes I use those loops to add fringe.
Again, use a large bobby pin, loop strip onto bobby pin
 and run the fringe through the loop from the left front side. . . .
My strip is 1" X 17".


Remove the bobby pin. . . .Pull ends through fringe strip loop. . . .


Pull tight. . . .Continue across the rug ends.
 

With each rug you weave, you'll learn your own shortcuts and preferences. . . .As long as you stick to the basics, there's really no set rules. . . .Experiment and have fun!

In case you missed any of the previous Rag Rug posts:
Denim Rag Rug on the Farmhouse Table
I'm Weaving with a New Rag Rug Loom
Rag Rugs: A Delta Folk Art
Rag Rug Inspiration

If you wish to order a loom, please shop at:
Our Old Country Store


Here's a sneak peek at one of the little hot pads I've been working on. . . .Isn't it cute?
We'll have a giveaway soon for the loom. . . .Don't miss it!
 
Happy Rag Rugging, Everyone!

. . . from my farmhouse to yours. . .


Sunday, January 27, 2013

Galvanizing the Kitchen with Buckets, Tubs & Other Such Things


Galvanized buckets and tubs were stacked high in our garage, waiting for their yearly scrubbing and disinfecting. . . .During the summer, they're in use outdoors in and around the farm. . . .Every winter, we try to give them a good cleaning. . . .That's been my chosen task for the past few days. . . . Rubbing and scrubbing. . . .


Most of our galvanized pieces are vintage and well used. . . .Some have been here at the farm since the 1930s. . . .I love the patina that develops over the years. . . .


I was surprised to read that the galvanizing process dates all the way back to 1837. It was discovered that a coating of zinc would make iron and steel more rust resistant.  By the 20th century, this process had made wooden buckets and tubs pretty much obsolete. . . .but not without some resistance. . . .


From the New York Times, July 25, 1915. . . .

"The old oaken bucket and the familiar washtub have been almost displaced by the galvanized steel articles that are much cheaper though not nearly so serviceable or lasting."

I think they lasted a lot longer than expected!


Personally, I can't imagine running a farm without galvanized buckets, tubs, feeders, wire crates--well, the list could go on an on. . . .They are as much a part of the farm as tractors and other equipment. . . .


Once I had everything scrubbed clean and lined up on the table, it occurred to me how charming a few of them would be gathered in the kitchen. . . .I was ready for a change and was sure I could find many uses for them. . . .such as setting the buckets on top of the cupboards for extra storage--yet keeping the look clean and simple.


I cleared out the dishes in the tub on the 1930s hutch and filled it with tablecloths, runners, and napkins. . . .An old fryer basket became a bowl for apples. . . .a nice look with the blue and white transferware. . . .

I grabbed a few pewter plates for a backdrop in the open space of the side cupboard. . . .


. . . .and added an aluminum water pitcher, too. . . .


By this time, I was getting the hang of it. . . .


You don't have to live on a farm to enjoy the age and beauty of old farm stuff. . . .Unadorned and simply finished, they fit in well with many styles of decor--Shabby Chic, cottage, rustic, modern--just about any decorating style. . . .

Seems to me, every home could benefit from a little galvanized patina. . . .They create a look that's fresh and interesting. . . .plain and simple. . . .


Don't have any pieces of your own? Then get out there and scour thrift stores, flea markets and antique malls. Or, check out Etsy. . . .or, Ebay. . . .

 Vintage Rustic Tool Box   Vintage Wire Gym Locker Basket Galvanized Blue Band Gas Can 

(above: from Old Time Pickers on Etsy)

I'm sure many Etsy shops carry galvanized items. . . .Feel free to share your favorites with all our "farmhouse" friends in a comment below. . . .

Now that I have this project finished, I can get back to my rag rugging without feeling guilty. . . .I haven't forgotten my promise for a daytime Farmhouse Bath Reveal or the Tips on Rag Rugs. . . .They're coming soon--just need to put on some finishing touches!

. . . from my farmhouse to yours. . .


Friday, January 25, 2013

Features from Country Whites Weekend #2

"This little light of mine,
I'm gonna let it shine. . ."


And, didn't each one of you "let your little light shine" at
The Country Farm Home
and
Old Time Farmhouse
 Country Whites Weekend!

 With 33 links and hundreds of visitors, I think the party was a success!

Did you have fun?
I've received numerous emails, telling me how much
they enjoyed the party and will be back next month. 
Sure hope you'll join them!

Heartfelt Thanks to each of you for making
the January Country Whites Weekend such a success--
for letting your light shine on all of us. . . .


Cindy and I both appreciate your time, talent, and inspiration.
It was an honor to have you at the party.
Each post was truly a delight and warmed our Country Hearts!

Ready for the Features, Country Friends?
The top three most viewed were. . . .


I think Angie touched each one of our hearts
with her simple but moving post.
The song has always been one of my favorites.


Elizabeth kept her winter look simple and sweet with
 

Her chippy window and mirrored snowflakes certainly speak of
a lovely winter style. . . .


And, the cute little snowman is a seasonal reminder
to enjoy the beauty of that white stuff outdoors.
Hop on over there and see more of Elizabeth's living room!


Judy asked
May I Have This Dance at Gold Country Cottage--
opening her post with an adorable blackboard and a song. . . .


"but the fire is so delightful. . . ."


Makes a person want to cozy up to the fire-- 
such a warm and welcoming Country at Heart setting.
It's a delightful post. . . .be sure and check it out.


Before I reveal my Country Whites Pick for the month of January,
I'd like to remind each of you to be sure you link back to the party!
Several wonderful posts were disqualified because there was no link back
to The Country Farm Home or Old Time Farmhouse. . . .
Remember to check your back link next time!

That being said, my January Country Whites Pick is:
Chateau Chic's Vintage Dish Drainer 


 Mary Alice certainly captured Plain and Simple Country Style
with her beautiful stoneware and vintage wire basket. . . . .


She embraced her Country Whites. . . .and Inspired us to do the same.
Didn't you feel you were right at home while visiting her post?
I don't know about you, but I was totally Charmed. . . .

Now, go to Cindy's Old Time Farmhouse and see who she picked!
She's waiting for you to stop by. . .

If you were featured, please grab our Button. . . .
hope you'll display it proudly. . . .


Country Whites Weekend
begins every third Friday of each month
and runs through Sunday night. . . .
You can join the next one on Friday February 15th,
starting around 6:00 a. m. CST.
Us Country Gals wake up early!

Sure hope to see each of you again. . . .
and this time, bring a friend!
Everyone is Welcome!


Til next time. . . .Don't forget to let your little light shine. . . .


 . . from my country farmhouse to yours. . .


Related Posts Plugin for WordPress, Blogger...